Arduino WebServer with Ethernet shield, HTML and AJAX
View the status of the sensors of the home automation system on the web

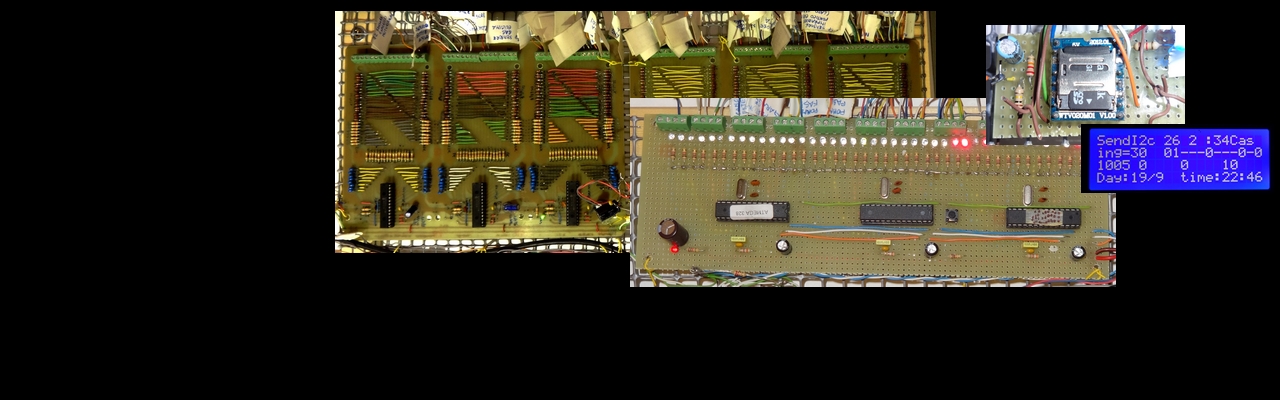
On right side you can see the Webserver. It is build with a Arduino 2560 Mega board and a Ethernet shield.
I have created a first version of this Arduino Webserver using only HTML. It worked, but at every refresh will re-updating the whole pagewith an annoying flicker of the page and images. So I used HTML + Ajax to write a web page and software.
But given that the routines for feature WebServer weighed in terms of CPU and memory occupation and therefore would slow the program’s main house management is described in this site; I have preferred to confine the program to a second Arduinoboard, which is responsible for producing the web page with the data received via I2C.
In this way to the management program of the house is demanded only the task of sending a set of bytes representative in each single bit status of a sensor, towards the Arduino dedicated as webserver. This then displays an image over a colored circle.The result is to see a plant with the active sensors. Not just in real time, but with a refresh of a few seconds.
Given that the program is confined to an Arduino WebServer aside, it is easy to copy and adapt it in your projects for other purposes. This makes it easy to manage a shop, a hangar, factory or toy son. For example, you can put two photos of your home on internet; one with the door open and the other closed and display a photo of the two, in accordance with the state of the sensor of the door. It is an example which gives an idea of the potential of the program, but do not put on the Internet the status of sensors which are important for safety.
The following image gives an idea of the result graph. The state of the sensors are represented by dots that change color to blue or red. A ring that moves around the ball attracts attention on the last status change. The circle can be red or blue, depending on the state of the sensor. Lastly at each change in state of a sensor, on it appears a bar that expresses a 2-minute time. In this way you can see at a glance the sequence of the activated sensors at the passage of a person.

Home plant with sensor status.
| Viewing sensors with HTML- Ajax | Note: this link is active often, but not always.When the active colored circle switch on and off almost in real-time (refresh 2 seconds). Certain circleschanged randomly to not allow strangers to go back to the real state of the house. Randomness is implemented in a routine not included in the sketch present on this web page. |
In the link above, the background image does not represent any real home. Since only a reference to the position of the red circle. For example, in your projects, you can put the background of a cat and to make sure that the ball in the proximity of the whiskers indicate an open window, the one on the ear tells you the light on and so on. In other words associated with the image and position of the circle so that they have meaning only for you. It’s okay, as in the link above, a drawing of a plant apparently plausible but in reality is completely invented.
How to make the Arduino Webserver
Take two Arduino connected I2C to each other and put the two programs below. The first is the webserver. The other is the test program that sends data. The test program allows you to see the changing status of the sensors on the webpage. You can modify it to include and display on the internet your sensors.
Sketch Arduino Webserver: View the status of the sensors in an HTML Ajax page
So the program is as follows. To consider that I installed in a home. Nobody forbids to adapt and modify it to control your needs: a shop, a hangar, factory or toy son. This software release provides only the circles color change in according to the sensor status. Does not display animation and time bars over the sensors.
/*————————————————————————-*/
/* WebServerwithHTMLandAjax */
/* shows representative images of the state of the sensors in an htmlpage */
/*————————————————————————-*/
/* myelectronichome.altervista.org */
/*————————————————————————-*/
#include <SPI.h>
#include <Ethernet.h>
#include <Wire.h>
int address = 55; //address I2C
byte Stato_sensori[10]; //from I2C receive 10 byte
byte mac[] = { 0xDE, 0xAD, 0xBE, 0xEF, 0xFE, 0xED }; //mac
IPAddress ip(192,168,1,111); // IP address
EthernetServer server(80);
String HTTP_req;
void setup()
{
Serial.begin(115200); // for diagnostics
Ethernet.begin(mac, ip); // initializeEthernetdevice
server.begin(); // start to listen for clients
Serial.println(“WebServer_html-Ajax: Start”);
Serial.print(“WebServerAddress: “);
Serial.println(Ethernet.localIP());
//Section Wire
Wire.begin(address);
Wire.onReceive(receiveEvent);
Stato_sensori[0] = 0;
Stato_sensori[1] = 0;
Stato_sensori[2] = 0;
Stato_sensori[3] = 0;
Stato_sensori[4] = 0;
Stato_sensori[5] = 0;
Stato_sensori[6] = 0;
Stato_sensori[7] = 0;
Stato_sensori[8] = 0;
Stato_sensori[9] = 0;
}
void loop()
{
EthernetClient client = server.available(); // try to get client
if (client) {
boolean currentLineIsBlank = true;
while (client.connected()) {
if (client.available()) {
char c = client.read();
HTTP_req += c;
if (c == ‘\n’ && currentLineIsBlank) {
// send a standard http response header
client.println(“HTTP/1.1 200 OK”);
client.println(“Content-Type: text/html”);
client.println(“Connection: keep-alive”);
client.println();
//AJAXrequest for switch state
if (HTTP_req.indexOf(“MyElectronicHome”) > -1) {
GetSensorState(client);
}
else
{ // HTTP request for web page
// send web page – contains JavaScriptwithAJAXcalls
client.println(“<!DOCTYPEhtml>”);
client.println(“<html>”);
client.println(“<head>”);
client.println(“<title>MyElectronicHome: Sensor</title>”);
client.println(“<script>”);
client.println(“function GetSensorState() {“);
client.println(“nocache = \” &nocache=\” + Math.random() * 1000000;”);
client.println(“var request = new XMLHttpRequest();”);
client.println(“request.onreadystatechange = function() {“);
client.println(“if (this.readyState == 4) {“);
client.println(“if (this.status == 200) {“);
client.println(“if (this.responseText != null) {“);
client.println(“document.getElementById(\”Sensor\”).innerHTML = this.responseText;”);
client.println(“}}}}”);
client.println(“request.open(\”GET\”, \”MyElectronicHome\” + nocache, true);”);
client.println(“request.send(null);”);
client.println(“setTimeout(‘GetSensorState()’, 2000);”); //2000 for 2 seconds refresh.
client.println(“}”);
client.println(“</script>”);
client.println(“</head>”);
client.println(“<body onload=\”GetSensorState()\”>”);
client.println(“<h1>MyElectronicHome</h1>”);
client.println(“<DIV id=\”casa\” STYLE=\”position:absolute; left:30px; top:140px\”> <img src=\”http://myelectronichome.altervista.org/joomla/images/arduinowebserver/casa.gif\”> </DIV>”);
client.println(“<p id=\”Sensor\” STYLE=\”position:absolute; left:0px; top:60px\”> Please Wait…</p>”);
client.println(“</body>”);
client.println(“</html>”);
}
HTTP_req = “”; // finishedwithrequest, empty string
break;
}
// every line of text received from the client endswith\r\n
if (c == ‘\n’) {
currentLineIsBlank = true;
}
else if (c != ‘\r’) {
currentLineIsBlank = false;
}
} // end if (client.available())
} // end while (client.connected())
delay(1); // give the web browser time to receive the data
client.stop(); // close the connection
} // end if (client)
}
void GetSensorState(EthernetClient cl)
{
//on byte received reads bit and printhtmlistruction
//Attention: when there are a big amount of cl.print, withoout F(“….”) macro the program will stop.
int j1=0 ;
int j2=0 ;
//on J1 the byte, on j2 the bit of the byte
j1=0;j2=0; if (bitRead(Stato_sensori[j1],j2)==1) {cl.print(F(“<DIV id=\”0\” STYLE=\”position:absolute; left:0px; top:00px\”> <img src=\”http://myelectronichome.altervista.org/joomla/images/arduinowebserver/rosso.gif\”> </DIV> “));}
j1=0;j2=1; if (bitRead(Stato_sensori[j1],j2)==1) {cl.print(F(“<DIV id=\”1\” STYLE=\”position:absolute; left:0px; top:00px\”> <img src=\”http://myelectronichome.altervista.org/joomla/images/arduinowebserver/rosso.gif\”> </DIV>;”));}
j1=0;j2=2; if (bitRead(Stato_sensori[j1],j2)==1) {cl.print(F(“<DIV id=\”2\” STYLE=\”position:absolute; left:0px; top:00px\”> <img src=\”http://myelectronichome.altervista.org/joomla/images/arduinowebserver/rosso.gif\”> </DIV> “));}
j1=0;j2=3; if (bitRead(Stato_sensori[j1],j2)==1) {cl.print(F(“<DIV id=\”3\” STYLE=\”position:absolute; left:00px; top:00px\”> <img src=\”http://myelectronichome.altervista.org/joomla/images/arduinowebserver/rosso.gif\”> </DIV> “));}
//Many lines are not shown but they must continue numbering J1 and J2
j1=1;j2=7; if (bitRead(Stato_sensori[j1],j2)==1) {cl.print(F(“<DIV id=\”15\” STYLE=\”position:absolute; left:110px; top:420px\”> <img src=\”http://myelectronichome.altervista.org/joomla/images/arduinowebserver/rosso.gif\”> </DIV>”));}
//Many lines are not shown but they must continue numbering J1 and J2
j1=2;j2=0; if (bitRead(Stato_sensori[j1],j2)==1) {cl.print(F(“<DIV id=\”16\” STYLE=\”position:absolute; left:320px; top:170px\”> <img src=\”http://myelectronichome.altervista.org/joomla/images/arduinowebserver/rosso.gif\”> </DIV>”));}
//Many lines are not shown but they must continue numbering J1 and J2
j1=2;j2=7; if (bitRead(Stato_sensori[j1],j2)==1) {cl.print(F(“<DIV id=\”23\” STYLE=\”position:absolute; left:80px; top:200px\”> <img src=\”http://myelectronichome.altervista.org/joomla/images/arduinowebserver/rosso.gif\”> </DIV>”));}
//Many lines are not shown but they must continue numbering J1 and J2
j1=9;j2=1; if (bitRead(Stato_sensori[j1],j2)==1) {cl.print(F(“<DIV id=\”73\” STYLE=\”position:absolute; left:230px; top:880px\”> <img src=\”http://myelectronichome.altervista.org/joomla/images/arduinowebserver/rosso.gif\”> </DIV>”));}
}
void receiveEvent(int howMany)
{
//receive I2C byte from otherArduino
Serial.println(“Start receive”) ;
int index_x=0;
while (Wire.available() != 0)
{
byte ricevuto;
ricevuto = Wire.read();
Stato_sensori[index_x] = ricevuto;
index_x = index_x + 1;
}
Serial.println(“Data received…”) ;
}
Test program
Put on a arduino, connected through I2C with another arduino with ethernet shield board.
This program simply sends a set of bytes per second Arduino. Note that sending the same byte 10 times. The instructions in dark red are the ones that you must include in your projects.
#include <Wire.h>
int address = 55; //indirizzo I2C
void setup()
{
Wire.begin(); // join i2c bus
}
byte x = 0;
void loop()
{
Wire.beginTransmission(address);
//Send byte x more times
Wire.write(x); // sends one byte 1
Wire.write(x); // sends one byte 2
Wire.write(x); // sends one byte 3
Wire.write(x); // sends one byte 4
Wire.write(x); // sends one byte 5
Wire.write(x); // sends one byte 6
Wire.write(x); // sends one byte 7
Wire.write(x); // sends one byte 8
Wire.write(x); // sends one byte 9
Wire.write(x); // sends one byte 10
Wire.endTransmission(); // stop transmitting
//Display X byte
Serial.println(x,BIN);
x++;
if (x>255) {x=0;}
delay(2000);
}
In addition to the program, you need two images, one as a background and the other with a single red bullet (as this example ![]() ) to put on a website. the second image (red bullet) will be superimposed on the background, based on the state of the sensor. Any blue bullet designed in the background allows you to view blu-red depending on the state of the sensor. This visual game can also get by stacking alternately blue and red dots in the background though so for the same effect requires more resources (more program lines). The strings with the web addresses to be changed are written in red.
) to put on a website. the second image (red bullet) will be superimposed on the background, based on the state of the sensor. Any blue bullet designed in the background allows you to view blu-red depending on the state of the sensor. This visual game can also get by stacking alternately blue and red dots in the background though so for the same effect requires more resources (more program lines). The strings with the web addresses to be changed are written in red.
Particularity
For the graphic image you can make a grid with the free program Photofiltre (menu, click filter, other, grid generator and make a grid side 10). Draw your map and color in red the grid squares where you want to insert ourselves on the ball of the sensor. Once done you need to update the ball coordinates (example: left: 110px; top: 420px) on the sketch Webserver so that they are confined above the square filled with red color. After determining the coordinates of all the shots you can change the background image with your own choice.
Advise you not put the exact plan of the house but a different image that will serve to you for reference, but remains incomprensibie to others (eg, the cat’s eye circle represents the gate open) .
It was decided Ajax because the automatic refresh of an html page would have resulted in a flashy and annoying flicker.
The ip address of the webserver constantly changes, if there is a memory card in the ethernet shield .
The image is stored on an external free website, in my case on Altervista servers.
If, with your phone provider, does not have a particular contract, your IP address on the Internet changes. To alleviate this, you can use the DDNS feature of your router in conjunction with one of the many free DDNS service on the Internet. In my case I used dlinkdns.com. Once registered and configured, these sites allow you to get the address changed on your system through a fixed URL. This is possible because at power on, the router sends your ip at DDNS service provider.
If you find the program useful and will use it, I ask the courtesy to send me an email / postcard (even anonymously) to tell me that you did it successfully.
Tips for a better translation are appreciated.
If you try it, let me know your impressions